INFORMATION Applying Multiple Materials to Single Objects READ NOW - Welcome to our blog
Home Design Minimalist, we have provided articles about INFORMATION Applying Multiple Materials to Single Objects READ NOW, as you're looking for, this site also provides more information about the house like a
home design that is
simple, luxury, design bedrooms, bathrooms, windows and doors are beautiful will make you comfortable at home with your family, interior and exterior will be tempting you to have a house like that we display.
You are looking :
INFORMATION Applying Multiple Materials to Single Objects READ NOW
Link article :
INFORMATION Applying Multiple Materials to Single Objects READ NOW
Article 3d lighting,
Article 3d materials,
Article 3d modelling,
Article 3d rendering,
Article 3d software,
Article 3d textures,
Article blender,
Article Mapping,
Article material,
Article materials,
Article materials and textures,
Article multiple textures,
You can also see our article on:
INFORMATION Applying Multiple Materials to Single Objects READ NOW
In this tutorial, we will be learning how to apply multiple materials and textures to single objects. In this example, we will be creating a building, using two materials, for the building walls, and the building’s rooftop.
 |
| Multiple Materials applied in a Final Render |
Step 1: Creating the shapes
Open a new Blender project.
 |
| New Project |
Rather than the deleting the default cube that appears in new projects, we will be using it. Use scale on Z axis (‘S’, then ‘Z’) to make the cube slightly taller, then grab and move on z axis upwards, so as to sit on the grid.
 |
| Scaled cube |
Add a plane (shift + A, in the ‘Mesh’ option) and scale wider than the cube, using the ‘S’ key.
 |
| Added plane |
Step 2: Edit Mode
Enter edit mode (tab) and ensure the ‘Face Select’ option is selected. This button is located along the bar at the bottom of the screen.
 |
| Circled selection, click 'Face Selection' |
Select each side of the building apart from the top (hold shift and right-click each side). The selected sides will appear orange.
 |
| When 'Face Selection' is on, faces should appear as above |
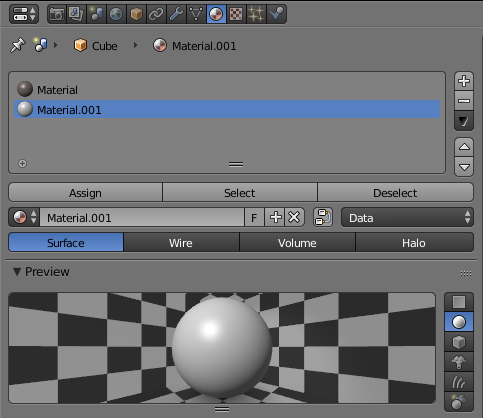
Step 3: Adding Materials and Textures
Go to the Materials tab on the right-hand side of the screen and add a new material, then proceed to the textures tab, and add a new texture – ensure that the type is ‘Image or Movie’.
 |
| Materials Tab |
 |
| Textures Tab |
Once you have added the texture, click ‘Open’ underneath the ‘Image’ dropdown, and open your texture. You can choose whichever texture you require. Since we’re making a building in this tutorial, I’ll be using a residential building texture. In order to gain a more realistic textured object, you should use seamless textures.
 |
| Added Texture |
 |
| Image dropdown |
Step 4: Mapping and Assigning the Walls
Once you have added your texture, you may want to map it in order for it to appear more realistic and neat. In order to do this, remain in the Textures tab, and scroll down until you find the ‘Mapping’ dropdown. Underneath this, change the ‘Coordinates’ to ‘Global’, and the ‘Projection’ to ‘Cube’. If you want to increase or decrease the size of the texture, you can change the ‘X’, ‘Y’, or ‘Z’ sizes.
 |
| Image Mapping for Building |
Go back into the Materials tab, and select the ‘Assign’ button. This will assign your selected material and texture to the faces you have selected – as long as they are still selected.
 |
| Assign button |
Step 5: Adding the Second Material
Once you have assigned the material to the walls of your building, select the roof of it by itself, and proceed to add another material.
 |
| Roof Face Selection |
 |
| Second Material added |
With this material selected, go back to the Textures tab and add a texture to it. For this, I’ll be using a concrete texture. Repeat the process of opening the texture underneath the ‘Image’ dropdown.
 |
| Add texture to second material |
Step 6: Mapping and Assigning the Walls
Once you have opened your texture in the Image dropdown, you may want to map the roof as well. In order to do this, simply scroll down to mapping, just as described beforehand, however, set the ‘Projection’ to ‘Flat’ this time. Keep the ‘Coordinates’ at ‘Global’.
 |
| Image Mapping for Roof |
Ensure that this texture is assigned to the rooftop. To do this, go back to your Material’s tab and ensure that the roof’s material is selected. Then make sure that your rooftop is still selected on the object onscreen. If both of these are selected, click the ‘Assign’ button again.
 |
| Assign button |
Step 7: Rendering your Scene
As on now, your building should have two materials assigned to it, each with a different texture. You can view this by changing the object display from ‘Solid’ to ‘Rendered’, or else to get a full rendered view, simply press F12 on your keyboard. This will give you a rendered view through the camera on your screen.
 |
| Rendered project |
 |
| Rendered through camera view |
You can use the same technique of applying a material and texture to your roof, as the plane.
 |
| Final Render |
Sample Renders:
You could experiment by adding more materials to each surface or the building, or try another shape with more than two materials.
 |
| Sample Render - Cylinder |
 |
| Sample Render - Monkey |
So information about INFORMATION Applying Multiple Materials to Single Objects READ NOW
Such articles that discuss INFORMATION Applying Multiple Materials to Single Objects READ NOW, may be useful to you in finding the inspiration to build houses.
You are reading arikel entitled
INFORMATION Applying Multiple Materials to Single Objects READ NOW and link this article you can save
http://homedesignminimalist1.blogspot.com/2016/01/information-applying-multiple-materials.html Hopefully information about
this is helpful for you.
,
3d materials,
3d modelling,
3d rendering,
3d software,
3d textures,
blender,
Mapping,
material,
materials,
materials and textures,
multiple textures,


0 Response to "INFORMATION Applying Multiple Materials to Single Objects READ NOW"
Posting Komentar